Are you trying to create a long meditation music soundtrack of 30, 60 minutes, or even more from a shorter music track?
In this post we will explain how to easily create a long audio track using either an audio or video editor.
Key takeaways
- Meditation videos are popular on YouTube and require long, seamless soundtracks.
- You can create long meditation music tracks from shorter clips using cross-fade techniques.
- Use free tools like Audacity or video editors to apply cross-fades, creating extended tracks.
- Import the short music clip, duplicate it, overlap the tracks slightly, apply cross-fade, and repeat until the desired length is achieved.

Why make long meditation audio tracks?
Meditation videos are very much popular on YouTube and elsewhere.
In fact, lots of creators actively make relaxation and mediation content (including guided meditations, affirmation, stress relief, and sleep videos).
Related: How to make money on YouTube with meditation videos
Meditation videos tend to be long, so they need long and seamless (no gaps) soundtracks.
A typical meditation video is 5, 10, or 20 min long.
If you look at relaxation or sleep videos, they can be even longer, some are as long as 8 or 10 hours.
In our royalty free music library, we have a growing collection of long meditation and relaxation background music, as well as 1 hour meditation music.
However, if you can’t instantly find a meditative soundtrack of desired length you can easily make one from one or more shorter clips.
Let’s see how you can make a long meditation music soundtrack:
Let’s make a long meditation music track
We’ll be using a technique called cross-fade.
If you never heard about cross-fading, no worries – it is super easy and quick to learn.
Cross-fade can help you to seamlessly join two or more audio files. You can do this once, twice, or as many times as you like, so you can extend the soundtrack to last hours.
If you’re working with beat based music you may need to pay special attention to make sure the beats align properly. However, it’s much more easier if you’re joining together two ambient music tracks.
Good news! Cross-fade works great for ambient meditation music.
First of all, let’s pick a music clip to extend.
For the sake of the example we will simply use one of TunePocket’s meditation music tracks:
As you can see, this music track is about 10 minutes long.
But what if we want to extend it to run for, say, 30 minutes or 1 hour.
If you want to create a very longer version of this track for your video, you can do it in two ways (both are easy!):
1. Extend the music file using a free audio editor called Audacity and then import it to your video (as you would import any other music file).
2. Extend the music file directly in your video editor.
Option 1: Make long meditation music in Audacity
First let’s load the above audio track into Audacity. Simply drag and drop it into the window.
Once it’s loaded, load it again on a new track / lane.
Then click on the little horizontal arrow in the menu and push the second track to the right leaving 10-15 seconds of overlap.
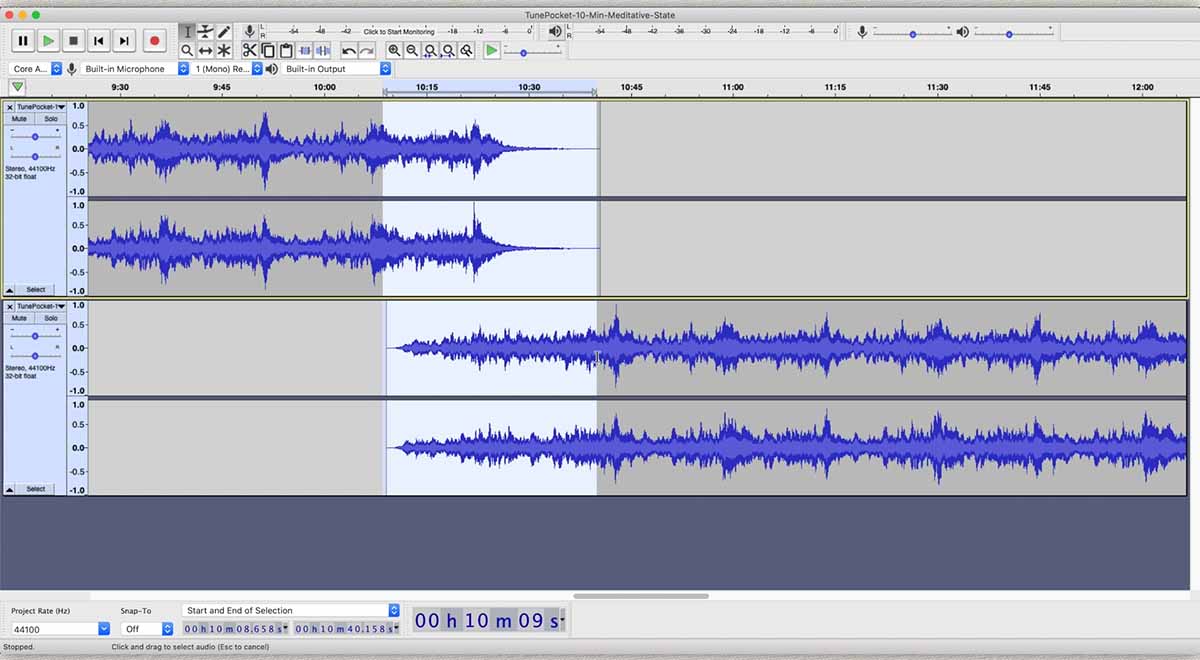
Select the overlapping area in both tracks and add the cross-fade effect (Menu -> Effects -> Cross-fade Tracks).
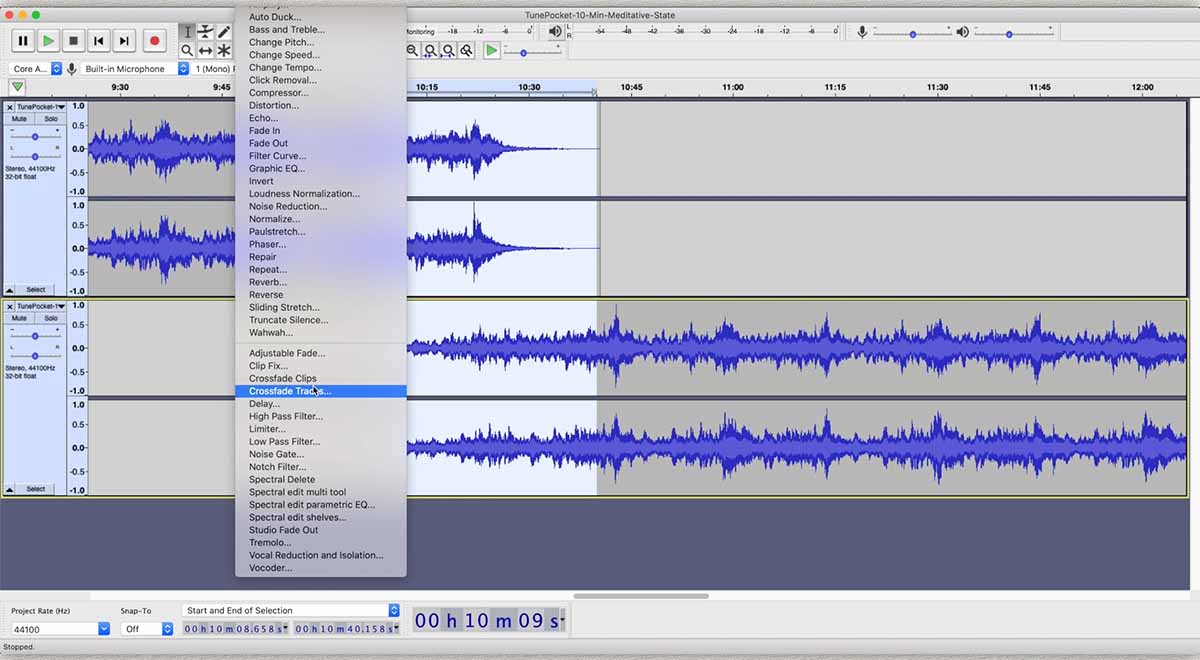
Click OK in the next dialogue window and that’s it! You have created a 20 min long meditation music track.
To make a 30 min long music track, repeat the process re-using the top lane in Audacity (or adding a new one, there is no difference).
Repeat for as many times as you need until you have the soundtrack of the desired length.
To finish the process, export the long music track in the desired format (WAV, MP3, and so on).
In the menu: File -> Export -> Choose desired format.
Option 2: Make long meditation music in any video editor
If you’re end goal is to make videos (as opposed to making podcast or guided meditations) you can extend the music directly in your video editor.
It does not really matter which video editor you’re using. Virtually all modern video editors support at least some sort of cross-fade capability.
In this example we’ll use Final Cut but you can do the same in any video editor, including free editors like Filmora.
We will use the same music track. Since it’s ambient music, it will be very easy to create seamless cross-fades:
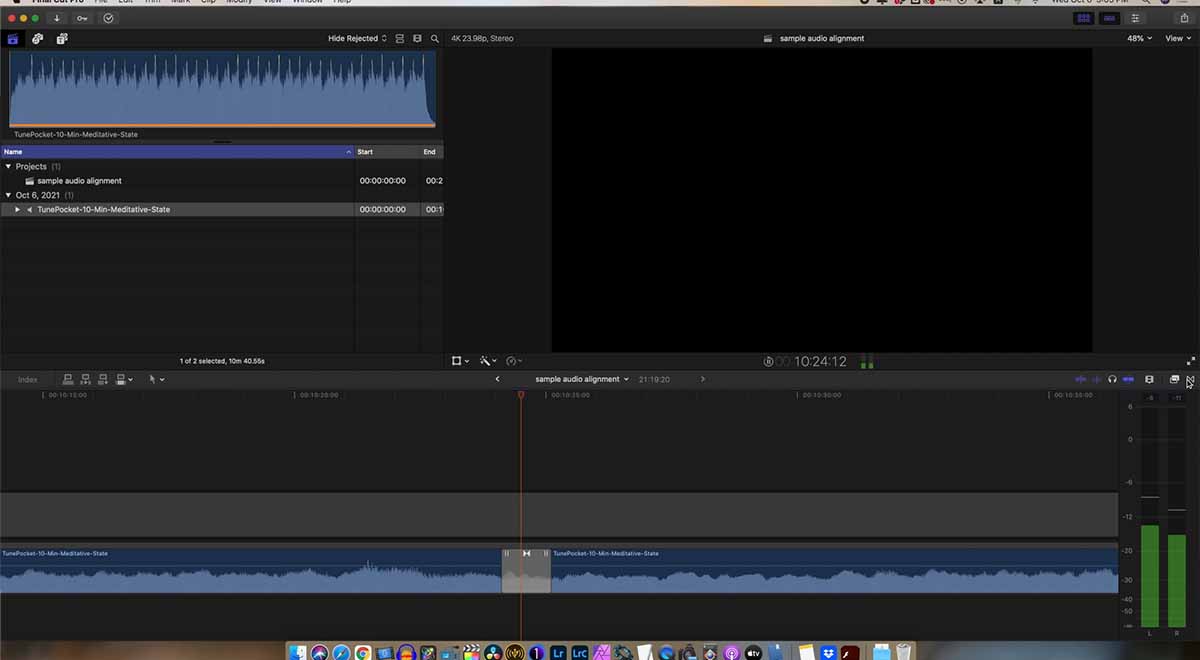
You can adjust the length of the transition to your taste.
Questions? Comments?
In this post we discussed two options you can use to make long meditation music tracks from shorter clips.
We hope you will find this helpful when making long format meditation / relaxation videos or podcasts.
Do you have your own favorite technique for creating long audio files?
Let us know by posting a comment below!
Download 14,000+ Royalty Free Music Tracks And Sound FX
Unlimited download | Lifetime license | Commercial use


HELLO, I signed up FOR A SUBSCRIPTION, AND I READ ABOUT HOW TO DOWNLOAD MUSIC. I AM LOGGED IN, AND I DO NOT SEE THE DOWNLOAD BUTTON UNDER THE SOUNDTRACK. CAN YOU HELP?
Thank you for purchasing the subscription! We are happy to help.
To download music from TunePocket, make sure you are logged into your account. You can download tracks directly from the search results by playing the song and clicking the download button.
Alternatively, you can download from each song’s details page by clicking the large blue download button. The music is available in MP3 or WAV format.
You can also download licenses for each track, which are available as PDF or text files.
You can find detailed instructions including screenshots and videos here: https://www.tunepocket.com/how-to-download-music-without-audio-watermark/
Don’t hesitate to let us know if you need any further assistance!
Huge thumbs up for the great info! It’s actually quite easy to do.
THis process (joining short videos to create a longer one) is usually called “video stitching”. Just so you have your terminology right
Could you share a blog about how to make a long meditation video? Because the blog on how to make long meditation music was very helpful to me, even for everyone
The process of creating long meditation videos from shorter clips can be broken down into several steps:
Gathering clips: The first step is to gather all the shorter clips that will be used to create the longer meditation video. These clips can come from various sources such as stock footage libraries, personal video archives, or other online sources.
Organizing clips: Once you have collected all the clips, you need to organize them in a way that makes sense for the longer video. This involves deciding on a storyline or theme (relaxation, waterfalls, nature, and so on) for the video and selecting the clips that fit into that theme. You may also need to trim or edit the clips to remove any unwanted footage.
Creating a storyboard: A storyboard is a visual outline of the video that shows how the clips will be arranged and edited together. This helps to ensure that the final video flows smoothly and tells a coherent story. Story may not be that important for a meditation video but we still encourage you to thing it through in advance, as opposed to just using a bunch of random short videos.
Editing the clips: After the storyboard is created, the editing process can begin. This involves using video editing software to cut and trim the clips, add transitions and special effects, and adjust the audio levels.
Adding music and sound effects: Music and sound effects can add depth and emotion to a video. You can choose music that fits the theme of the video and add sound effects to enhance certain scenes. You can choose from a collection of 1 hour meditation music tracks here: https://www.tunepocket.com/1-hour-meditation-music/
Color grading: Color grading is the process of adjusting the colors in the video to create a specific look or mood. This step can help to give the video a more professional and polished appearance, especially when you use video clips from various sources.
Reviewing and finalizing: Once the video is edited, it’s important to review it several times to ensure that it meets your expectations. You may need to make some final adjustments before exporting the final video.
Exporting and sharing: The final step is to export the video in a format that can be shared online or on social media. You can choose from various file formats and resolutions depending on the platform where the video will be shared.
Hope this helps!