Learn how to convert your existing marketing videos to full portrait vertical 9:16 format for better Facebook reach in 5 easy steps
Jump to the video version of this tutorial
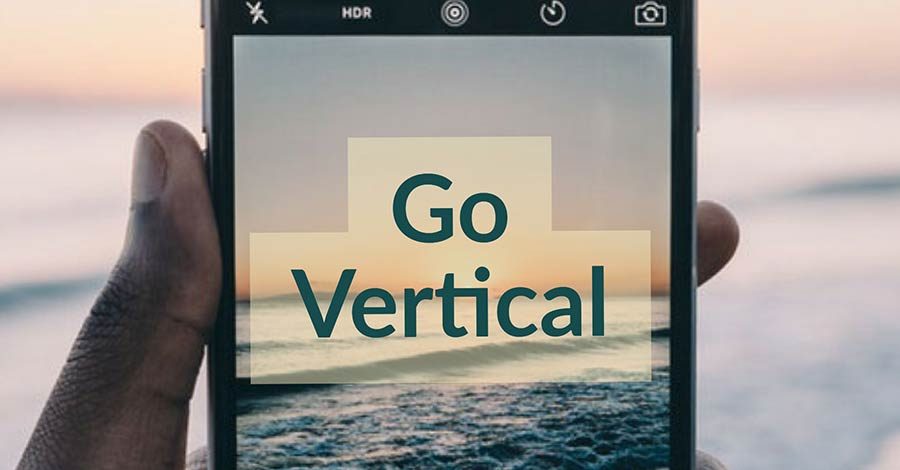
Why vertical?
Noways the majority of people in the world access the Internet on their mobile devises. In fact, in some countries, that majority accounts to more than 90%!
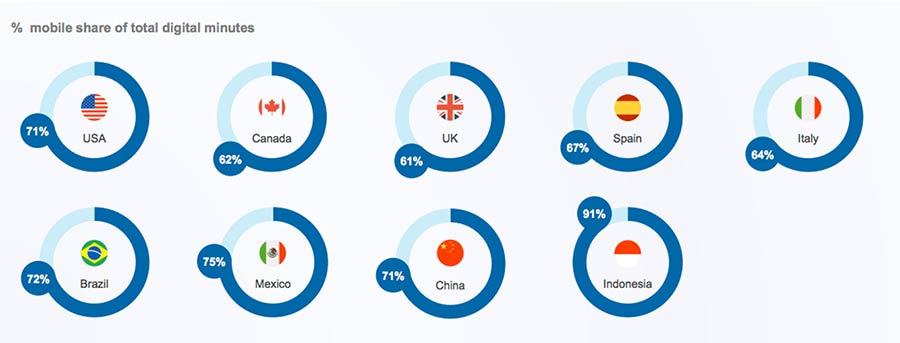
Infographic by comScore
If you are serious about marketing, you need to adjust your digital strategy to accommodate mobile users’ preferences.
According to Facebook, 79% of novice vertical video consumers agreed that the format is more engaging, and said they would choose the vertical format in most cases.
However, don’t see this as a roadblock. See this as an opportunity to engage more people on Facebook compared to using traditional 16:9 widescreen videos.
Start by re-using your existing videos
If you just starting out with marketing your business, you may consider creating vertical videos from the start.
However, if you already invested considerable time into your video presence, re-creating all of your videos may be time consuming and costly.
Instead, start by converting some of you best performing videos and evaluate the results before investing more resources.
What I’m trying to achieve
For the purpose of this tutorial, I will use one of our marketing videos and convert it to 9:16 full portrait / vertical aspect ratio. That format should give us good compatibility with Facebook’s advertisement video requirements and will look great on most modern mobile devices.
Here’s the original 16:9 landscape video:
I will use Wondershare’s Filmora, a popular and affordable video editing software, to convert the above 16:9 video to full portrait 9:16 view in 5 simple steps. I’m using a Windows 10 computer, however the steps will be pretty much the same on Mac or on a computer running an older Windows version.
If you’d rather use Adobe’s Premiere Pro or Premiere Elements, our friends at SafeMusicList music library have created a similar tutorial for Premiere users.
Switch to: How To Convert Your Business Marketing Videos To Vertical Using Adobe Premiere Pro
No previous video editing experience needed!
Filmora is intuitive and easy to use, so this tutorial should help even if you have zero video editing skills.
ROYALTY FREE STOCK MUSIC SUBSCRIPTION
From $99/Year | Commercial Use | No Hidden Fees or Contracts | LEARN MORE
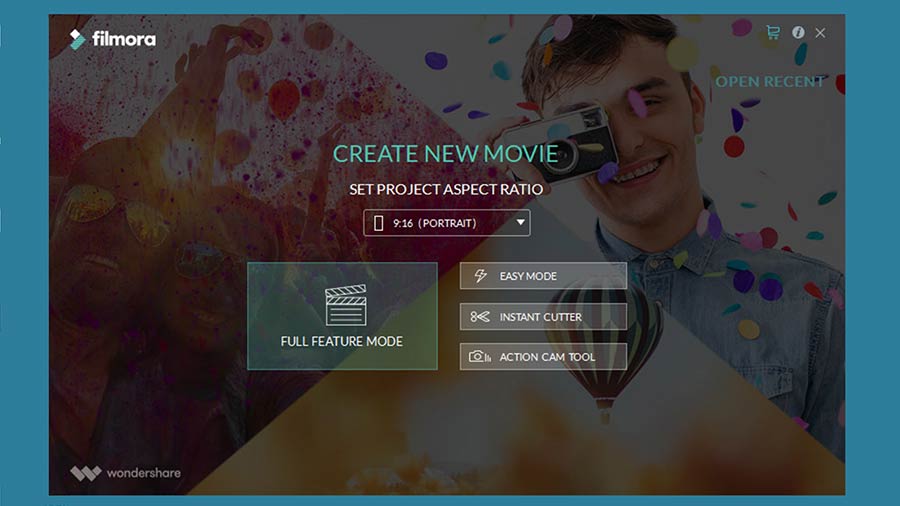
STEP 1: START A NEW PROJECT
Let’s start by creating a new Filmora movie. Choose the vertical 9:16 aspect ration and click on the Full Featured Mode button.
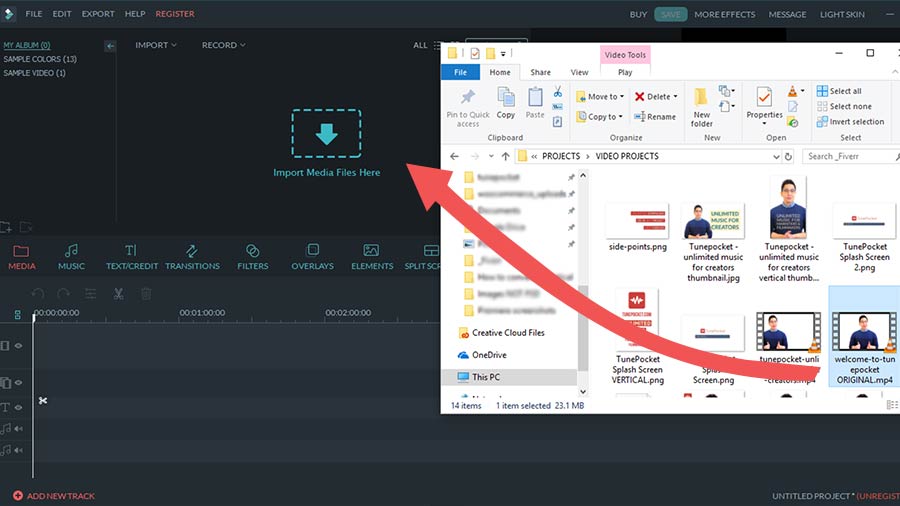
STEP 2: IMPORT YOUR HORIZONTAL 16:9 VIDEO
Now let’s import the original 16:9 video to Filmora by dragging and dropping it into the Media panel.
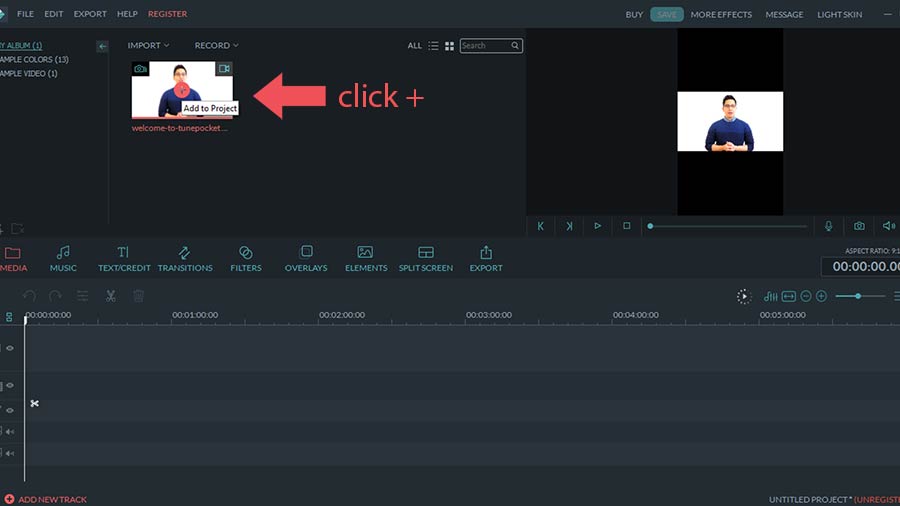
Once imported, the video appears in the Media panel and is ready to use.

Now we need to add this video to the project. Hover over the video file in the media panel and click on the red plus sign.
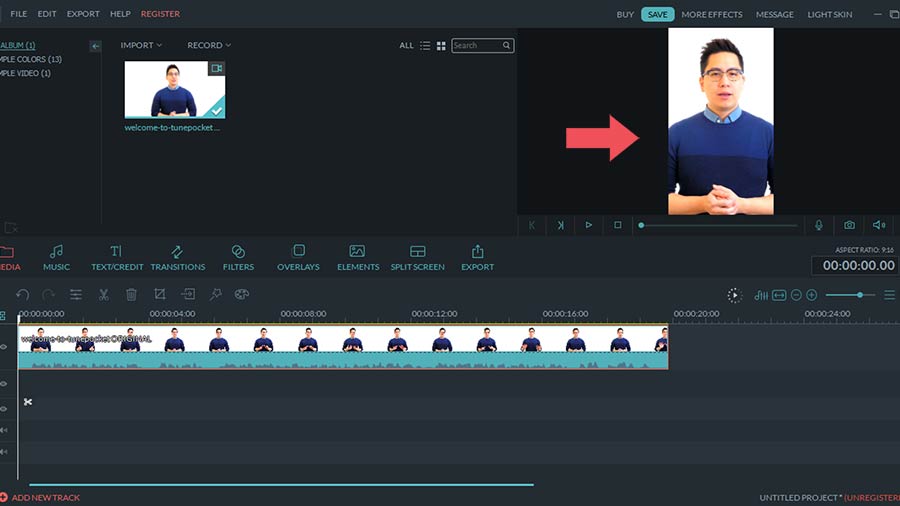
Now you see the video in the Timeline panel (bottom). However, if you look at the preview (top right), the video does not fit properly in the vertical frame.
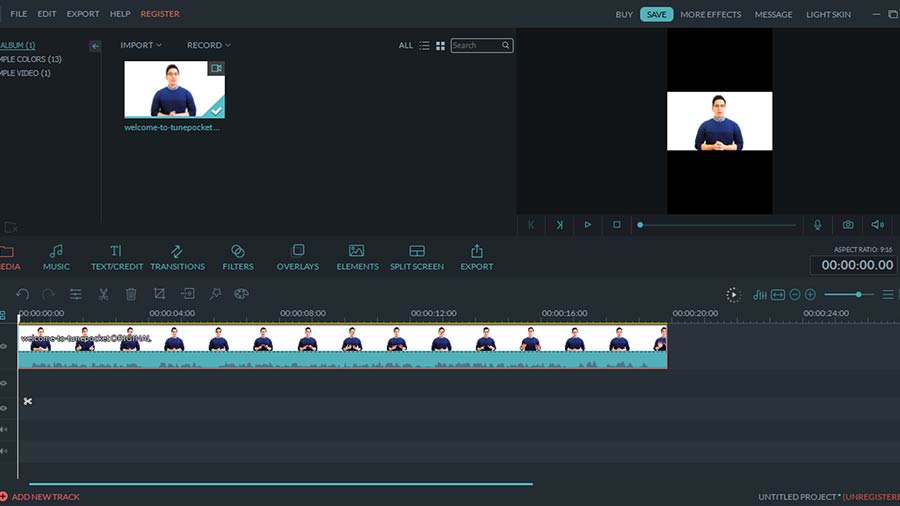
Our next step is to adjust the properties of the video to properly fill the vertical canvas.
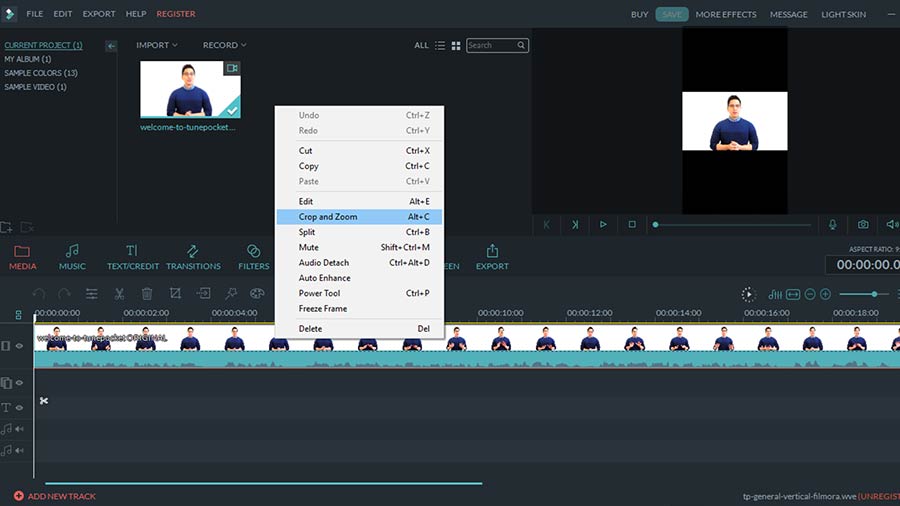
STEP 3: ADJUST THE VIDEO
Right click on the video in the Timeline and choose “Crop and zoom” from the menu:
On the Crop and Zoom screen, set the aspect ratio to 9:16 and crop the original video to your liking, so it fills the vertical frame. I cropped the video around its central area but you may need to do it slightly differently depending on the content of your video.
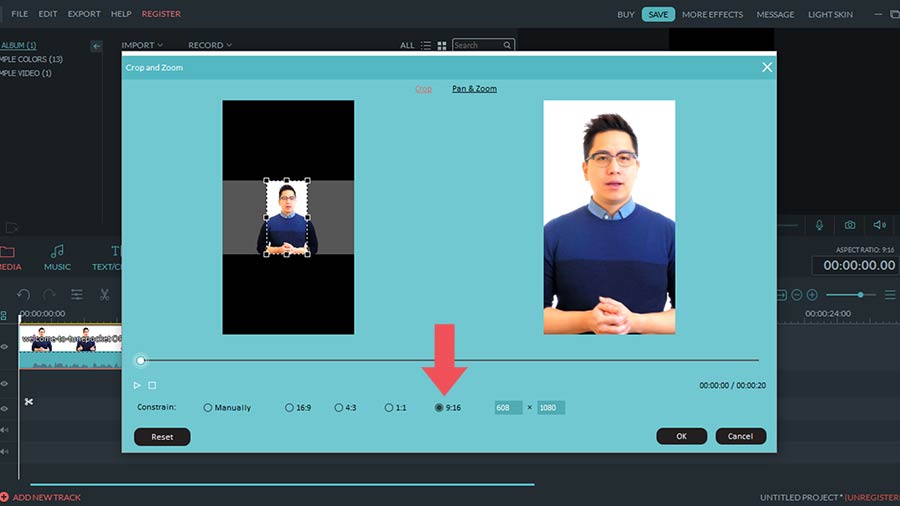
Click OK and note the changes in the Preview screen:
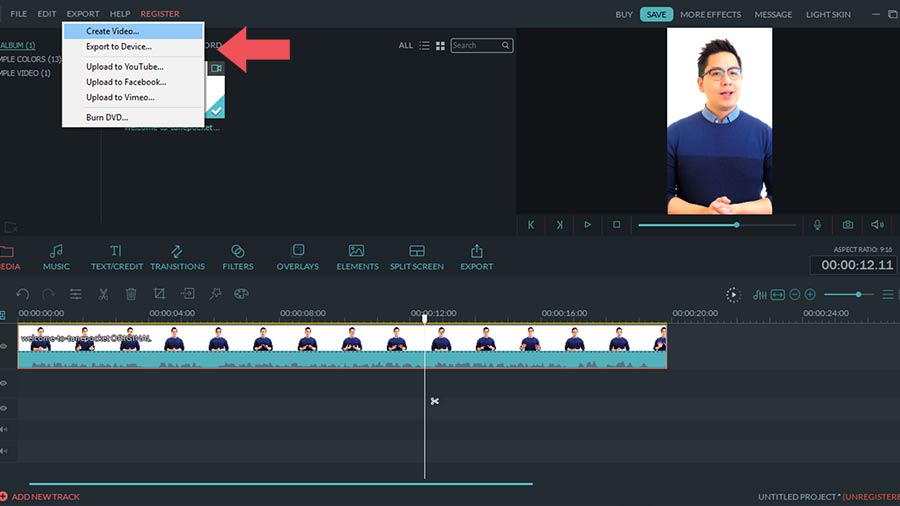
STEP 4: EXPORT THE VIDEO
At this point we are ready to save the video with its new vertical aspect ratio. Go to the Export menu and choose Create Video:
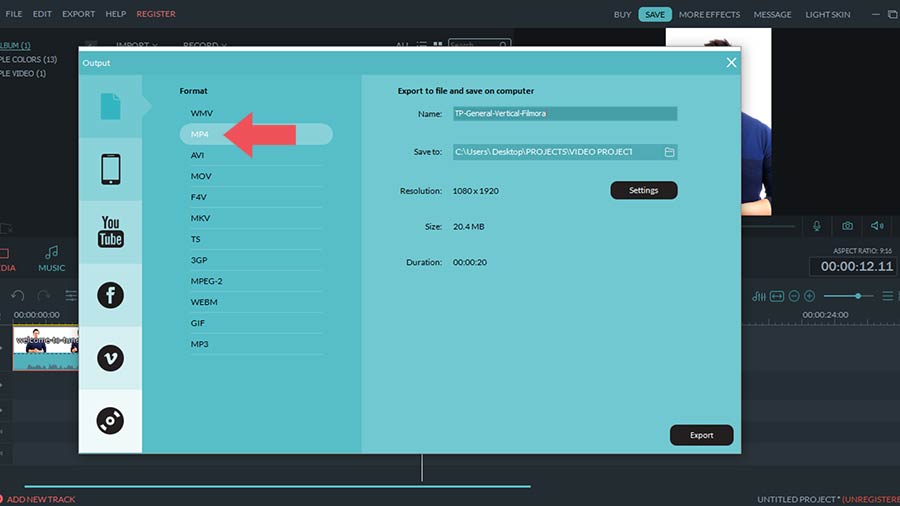
Choose MP4 format and give your new video a name. Specify the location where you want to save your video:
That’s it, we’re done with editing!
STEP 5: UPLOAD TO FACEBOOK
Finally, upload your video to Facebook. Here’s the final vertical version that I shared on TunePocket’s Facebook page:
Keep in mind, however, that full portrait 9:16 videos may not work in some Facebook feeds (most notably the Instagram).
Please refer to this specifications guide that explains which aspect ratio works for each Facebook feed.
If you prefer to use a square video (which will work great on both Facebook and Instagram) simply go back to Step 3 and use 1:1 square aspect ratio instead on 9:16.
UNLIMITED MUSIC & SFX FOR VIDEOS
Lifetime license. Save over 50% compared to similar services.
VIDEO TUTORIAL
Download 14,000+ Royalty Free Music Tracks And Sound FX
Unlimited download | Lifetime license | Commercial use